Sunday, December 13, 2015

Mushroom Barley Soup

Even though it was a wonderfully warm December day today (61 degrees on 12/13 in MICHIGAN!), I still wanted to make the soup I'd been planning to make while the mushrooms were still nice and fresh. Aaron and I love this soup; it's thick and filling while remaining healthy and low cal!

It's a pressure cooker recipe, so it's easy and on the table quickly. If you don't have a pressure cooker, the parts that call for using the browning feature can be replaced by medium-high heat. The 11 minutes at high pressure should be replaced by 45-55 minutes at medium heat, stirring frequently, until the barley is tender.


Ingredients:
1 TBS margarine (or olive oil)
1 onion, diced
1 celery rib, diced
2-3 carrots, peeled and sliced into thin circles (should measure about 1 cup)
16 ounces of mushrooms, sliced
4 cloves of garlic, minced finely
1/2 tsp thyme
1 tsp dill
1 tsp paprika
1 tsp ground pepper
1/4 cup merlot (optional)
3/4 cup pearl barley
6 cups vegetarian broth (I used 6 cups of water and 3 cubes of Not-Beef broth)

3 TBS cornstarch

Instructions:
Using the browning setting of your pressure cooker, melt the margarine and add in the onion, celery, and carrots, cooking for about 5 minutes while stirring occasionally. I used this time to wash and chop up my mushrooms, which I then add to the pot and cook for another 5 minutes, stirring regularly to prevent scorching. Add in the garlic, thyme, dill, paprika, pepper, and merlot (if using), barley, and broth. Close the lid and cook at high pressure for 11 minutes. Use a natural release.

I like to throw together some simple biscuits at this point so they are coming out of the oven right around when the soup is done.

Once the pressure cooker's lid is open, turn the browning feature back on and steal about 1/4 cup of the broth and put it in a small bowl, then slowly whisk in the 3 tablespoons of cornstarch. It should form a thick (but smooth) sauce. Add that mix back into the soup and allow it to come to a boil (about 1 minute) while stirring. Once it thickens, it's ready!

Serve with biscuits!

Nutrition (per 2-cup serving, makes about 8 cups):

Calories: 248
Carbs: 45g (22%)
Protein: 7.4 g (10%)
Fat: 3.4g (8%)
Fiber: 9.5g (27%)
Vitamin A: 103%
Vitamin C: 7%
Calcium: 8%
Iron: 11%


Saturday, November 14, 2015

Perfect Cornbread

Cornbread is great to make with chili, soups, or stews, especially if you've been making biscuits too frequently, as I have been doing lately! This cornbread is moist and slightly sweet. I had it with soup, as a snack, and for breakfast, and it's still lovely. It's good with a dollop of margarine, but it really doesn't need it! Aaron and I thought it was perfect, Emma wanted it to be a little sweeter.

Side-view of muffin interior - there's nothing dry about this muffin!

3/4 cup cornmeal
3/4 cup all purpose flour
1/2 tsp baking soda
1 tsp baking powder
1/4 tsp salt
3 tsp Ener-G egg replacer mixed with 4 TBS water (OR 2 TBS ground flax meal mixed with 6 TBS water) and set aside
2 TBS sugar
2 TBS flavorless oil (I used canola)
1/2 tsp vinegar
1/2 cup plain soy milk (or other non-dairy milk)
1 cup creamed corn

Preheat the oven to 350 and line a muffin tin with 12 liners.
In a large bowl, thoroughly mix the cornmeal, flour, baking soda, baking powder, and salt. Add in all of the rest of the ingredients, and stir until just mixed. Fill the muffin cups to about 3/4 full (depending on size of cups - just use all of your batter among the 12). Bake for 15-20 minutes and serve.

Nutrition (per muffin):

Calories: 94
Fat: 2.8
Carbs: 15.9 g.
Fiber: 2 g.
Sugars: 3.6 g.
Protein: 2 g.
Vitamin C: 1%
Calcium: 2%
Iron: 3%


Tuesday, October 27, 2015

Dad's Potatoes

To say that my dad didn't cook much is an understatement - when I'd see him on Sundays, we nearly always went out to eat if we weren't joining family for dinner. Once in a rare while, we'd go to his home - a total bachelor pad - and he'd cook. He had a few recipes I loved and these potatoes were always at the top of the list (along with his homemade holiday noodles and mac & cheese). They're especially good for a post-party breakfast with a simple tofu scramble, but honestly they're good at any meal!


~1 pound of potatoes (red skin or Yukon golds are best here) sliced thinly- I use a mandoline to make life easier.
3 TBS Earth Balance or other margarine
1/2 tsp dill weed
1/4-1/2 tsp salt
1/2 tsp ground pepper
1/4 tsp celery seed
1/4 tsp garlic 

Put the potato slices on a plate and microwave them for a minute. This helps them cook faster in the pan. If you don't have a microwave or just don't like using them, you can skip this step and cook longer on the stovetop.

Melt the margarine in a large pan over medium heat, then add the potato slices. Coat the slices with the melted margarine. Cover and cook for 3 minutes. Uncover, then stir and flip the potato slices to help them cook evenly. Continue cooking uncovered for about 10 minutes, then add the seasonings and keep going until soft and browned to your liking - it was about 5 more minutes for me, but this varies based on potato type and thinness. 

Monday, September 14, 2015

Spanish Rice & "Beef"

I adapted this from one of my totally-falling-apart Betty Crocker cookbooks. We give it about a 4 out of 5, and it's one of those dinners that comes together very quickly, which is always nice for a busy night.


2 TBS olive oil
1 cup uncooked long grain rice (I used jasmine)
1 medium yellow onion, chopped
1 bell pepper, chopped
1/2 jalapeno, diced finely
2.5 cups of water
1 tsp salt
1 tsp chili powder
1/2 tsp garlic powder
1 pinch saffron
1 cup of tomato sauce

Heat oil in a large skillet. Add the rice, onion, and pepper, and cook for about 5 minues, stirring frequently, until rice is golden and onion has softened. Stir in everything else, and heat until it boils, then cover and simmer for 30 minutes until the rice is soft. While that's happening, take a package of Gardein Beefless Tips and cook per the package directions. Once cooked, dice the Beefless Tips. In the final 5 minutes of cooking the rice, stir the diced pieces in, then serve. 


Nutrition (for 1/3 of the pan - a very satisfying serving size):

Calories: 499
Fat: 14.8 g
Carbs: 67.2 g
Fiber: 5.5 g
Sugars: 4.1 g
Protein: 22.6 g (31%)
Vitamin A: 40%
Vitamin C: 119%
Calcium: 5%
Iron: 76%

Monday, September 7, 2015

Homemade Ravioli With Pesto

My boyfriend recently decided to take the plunge and go from vegetarian to vegan last month, which is really exciting! One thing he's always loved is pesto, which is often not vegan, so I decided to veganize that. After I made a little batch of it, I thought it'd be fun to make homemade ravioli. Do not start this process unless you have a lot of time. It's a labor of love!

If you can enlist help, DO! My daughter started helping me with the noodles and it made it go by so much faster! She'd put the dough balls in, get the sheets nice and thin, and make the circles and I'd fill, pinch, and crimp. There are three recipes here, but this is so flipping good, you will not regret the time spent. I promise!! You could also skip one or more of the recipes. For example, you could make the pasta into linguine and toss with pesto or top with red sauce and the filling.

Filling the ravioli
A sheet of ravioli


Emma did not want pesto, so her ravioli were
 tossed in Earth Balance and nutritional yeast.
You could really eat them with any topping. Or none.
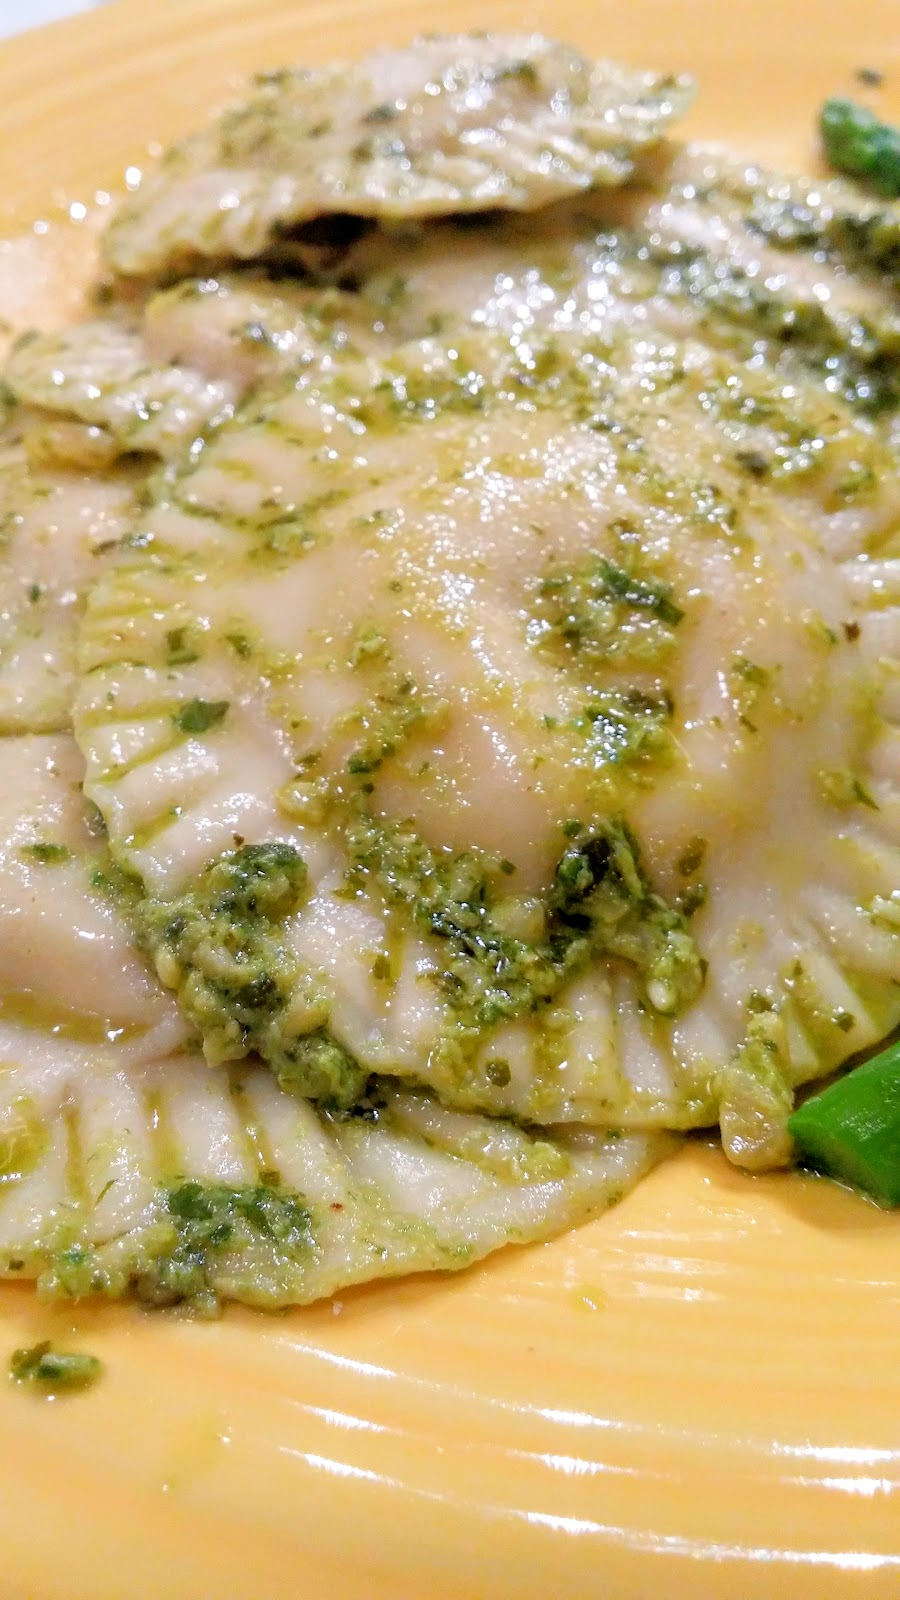
Mmmmm pesto-topped pillows of filled pasta


The Pesto

This doesn't actually make much. In fact, it makes about 6 tablespoons when all is said and done, and that's not very much. I would recommend doubling it, but I was feeling lazy and didn't feel like washing and drying more basil. Yes, too lazy to deal with a second cup of basil, but not too lazy for homemade pasta. I don't get me either.

1/2 TBS lemon juice
1/4 cup olive oil
1 cup washed and dried fresh basil leaves (packed)
3 TBS pine nuts
2 cloves of garlic
1.5 TBS nutritional yeast
1/4 tsp salt

Put this all into a high-powered blender (in the order listed) or a food processor until mixed and somewhat smooth. You want it to be a bit gritty. Scrape it all out into a container and stick it in the fridge.


The pasta

I am so thankful for my Kitchen Aid's pasta attachment. I don't think I could have done this without it! 

2 cups semolina flour
3/4 cups all purpose flour
1/2 tsp salt
1 cup warm water

Prep your mixer with the dough hook. Mix the flours and salt in the bowl of the mixer.Add the water a little bit at a time until a nice, smooth dough forms, using the lowest speed setting and scraping down the sides as needed. You may need a little more or less, depending on your ambient humidity. Let the mixer knead the dough for 7 minutes. Break the dough into 10 equal pieces, cover in plastic wrap, and set aside for at least 20 minutes to rest. While that's happening, you can make the filling!


The Filling

This filling is delicious in stuffed shells as well! It's rich, creamy, and flavorful. My daughter was eating it straight out of the bowl. You may wish to double this to make close to 100 ravioli or leave it as is and make about 50. It's up to you!

3/4 cup boiling water
1/2 cup raw, unsalted cashews
1 package of extra firm tofu, drained (standard 14 oz package)
1 TBS garlic powder (yes, tablespoon)
1 tsp oregano
1 tsp basil
1/4 cup nutritional yeast
1 tsp lemon juice
1 TBS olive oil

In a small saucepan, boil 3/4 cup water and add 1/2 cup cashews to the pan, cooking for a few minutes until cashews are softened. Add the cashews (and none of the soaking water) to a high-powered blender or a food processor, then crumble in the tofu and add the rest of the ingredients. Blend until completely smooth, scrape out of the blender (this is the worst part because this stuff is thick!) and then put into a bowl and set aside. Try not to eat it; you'll need it all for the ravioli!

The long part

Once you have the filling together and the pasta dough has rested, it's time to put it all together! Get a few sheets of parchment and line some baking pans to make this part easier.

 If you have the Kitchen Aid pasta attachment I have, you'll use the one that makes sheets. Grab one of your pieces and put it through on setting 1 - the thickest setting. Then run it through on 4. Finally, run it through on 6. 

My glass was about 3 inches in diameter
and I think that was the perfect size.
You could use a cookie cutter or ravioli
maker if you're fancy like that.
You should have a long, thin sheet of pasta. Place the sheet on the baking pan. Take a glass that seems like a good size for ravioli and cut out circles. In the center of the circle, place 1/2 TBS filling and then pinch the sides shut. After you pinch them, take a fork and crimp them all around, to be sure your filling stays put. You'll wind up with scraps of pasta. Take those and run them through again and again until everything is used up. No need to waste! 

If you're like me and you did not double the filling, you will find that you cannot use all of the dough for ravioli because you do not have enough filling. I recommend popping on the linguine attachment and making noodles because they're really good!

I wound up with 50 ravioli - that's 100 circles cut out of dough, plus an accidental sad loss of two of the dough bits and two more dough bits turned into noodles. 

If you won't use them all, stick the ones you want to save on a parchment-lined baking sheet and put that in the freezer for an hour. You can then add it to a freezer bag or container and freeze until you're ready to use. You'll cook for 4-5 minutes when ready to use.

The easy part

Get a big pot, fill it with water, and bring it to a boil. Add salt, maybe 1 tsp or so? Pop the ravioli in about 8-10 at a time, trying to keep them from sticking together (they really don't unless you crowd them) and cook for 3-4 minutes. They'll float when they're done. Toss each 8-ravioli serving in 2 TBS pesto, then serve. 

Nutrition:

For 8 ravioli (without sauce)

Calories: 408
Carbs: 59 g (29%)
Protein: 18.7 g (25%)
Fat: 11.7 g 
Fiber: 3.6 g
Sugars: 2.5 g 
Vitamin A: 53 IU 
Vitamin C: 1 mg
Calcium: 58 mg
Iron: 4.3 mg 

For 1/6 of the pesto (about 2 TBS)
Calories: 230
Carbs: 2.8 g (1%)
Protein: 2.4g (3%)
Fat: 25 g 
Fiber: 1 g
Sugars: .4 g
Vitamin A: 425 IU
Vitamin C: 2.1 mg
Calcium: 19.2 mg
Iron: .8 mg

Thursday, August 20, 2015

Potato & Bean Soup

Emma brought home some fresh potatoes from her grandparents' house, so I wanted to incorporate those into dinner. The original plan had been black bean soup, but I decided to go with something a little more delicate to highlight the freshness of the potatoes.

Emma thought it was great, but that the beans didn't match. Aaron really loved the beans (which is rare, he is typically pretty lukewarm about beans). I loved it, but I haven't met a bean or a potato I didn't like, so that was easy. :)

It would be cool if food looked as good as it tasted,
but that's not always the case. See above!


Ingredients: 
1 TBS olive oil
1 medium onion, finely diced
1 cup thinly sliced carrot
1 clove garlic
1 tsp dried dill weed
3 cups potatoes, peeled & diced
3 cups collard greens, sliced
2 un-chicken bouillon cubes
5 cups water
1 can cannellini beans, drained and rinsed

1 TBS flour mixed with 1/2 cup vegan sour cream (cashew cream would work here too, I'm sure)

Method:

Warm the olive oil over medium heat, then add in the onion and cook until soft and translucent, about 10 minutes. Add in the carrot and garlic and cook for another 5 minutes, until the carrot is soft. Toss in the dill, potatoes, greens, bouillon and water and cook (covered) for 40 minutes.

Once the potato is at the stage where you could obliterate it with the back of a spoon, take an immersion blender and blend briefly - you want to have a thick and creamy base, but you also want to leave some texture. If you don't have an immersion blender, take 2 cups of the soup and put it in a regular blender until pretty smooth, then return to the pot.

Add in the beans and cook over medium heat for 5 minutes, then add in the flour-cream mix and cook until heated through.

Serve with biscuits!

Makes about 6 cups.

Nutrition is per 1/6 of the recipe:

Calories: 224
Fat: 5.3 g
Carbs: 38 g
Fiber: 5.3 g
Sugars: 3.9
Protein: 7.1 g
Vitamin A: 92%
Vitamin C: 25%
Iron: 8%
Calcium: 7%


Friday, August 14, 2015

Easiest Ever Cashew Cream Sauce

I made some pasta tonight and decided to make a creamy sauce layer and then a spicy tomato sauce layer. The tomato sauce was a basic jarred marinara, some Boca crumbles, cayenne, and some chili oil.

The cream sauce, though, that was where the real magic was! It was good enough that Aaron insisted I write down the recipe. Sometimes simple is best!


Ingredients:
1 cup raw, unsalted cashews
1 1/3 cup water
1/2 tsp salt
1/4 tsp lemon juice (I used the kind from a lemon-shaped squeeze bottle)
1 tsp nutritional yeast

Method: 
Take the cashews and the water and put them in a pan. Boil for 5 minutes. Add this and the rest of the ingredients to a high powered blender (Vitamix or something similar) and blend for a few minutes until it's smooth and creamy. If you don't have a strong blender, it might turn out gritty, though boiling the cashews longer could help.

The sauce will already be warm and ready to serve!

Nutrition (per 1/6 of recipe - about 1/4 cup per serving):

Calories: 109
Fat: 8 g
Carbohydrates: 6.3 g
Fiber: 1 g
Sugars: 1.4 g
Protein: 3.6 g
Calcium: 1%
Iron: 7%

Sunday, August 2, 2015

My Mom's Apple Crisp

My mom makes the BEST apple crisp. I have tried many variations and nothing measures up. This is a very slight variation to accommodate more apples than her recipe calls for, but if you have fewer apples, you can use 4 cups of apples, 1/4 cup of water, an 8x8 pan, and the same topping recipe. It'll be thick with topping this way, and that's the way her recipe reads. My way below is healthier per serving and is still plenty decadent, but if you want the real mom experience, that's the way.

 I had a bunch of apples that we hated to eat out of hand - they were mealy and the skin was thick and the taste was that of an apple that lost some of its joy in life. They were sitting on the counter, getting sadder each day, when I had the idea that I would turn them into something wonderful. I figured if they couldn't be saved by becoming apple crisp, they were not salvageable. It turned out wonderfully, so I highly recommend using this method to prevent wasting apples you wouldn't otherwise eat. It also works well with delicious apples you want to turn into dessert, obviously. :)


Heat the oven to 400.

Make the cumble topping:
3/4 cup flour
1 tsp cinnamon
1 tsp salt
3/4 cup sugar

Mix those 4 things together in a mixing bowl, then cut in 1/3 cup margarine (I used Earth Balance) until it is well mixed in and the mix looks like the world's most delicious gravel.


Put into a greased, 11x7 baking dish in this order:
6 cups of peeled, sliced apples
1/3 cup water
all of the crumble topping

Bake for 30-35 minutes, until bubbly and beautiful. Good luck not eating the whole pan!!

Sunday, July 26, 2015

Spiced Summer Squash and Green Beans and Cauliflower Curry

I tried gardening for the first time in many years and it's been successful! I decided to make a dinner to use up some of the summer squash and green beans I've grown. Since that wouldn't make a lot of food, I also made a dish out of a cauliflower that I knew wouldn't last much longer in the fridge. These turned out to be so light and fresh while being deeply satisfying. 400 calories including rice? Yes, please! Don't let the seemingly long instructions fool you. I was able to make both recipes and the basmati simultaneously and it took me about 35 minutes to get it all together and on the table (chopping included).


Spiced Summer Squash and Green Beans

Ingredients:
1 large onion
1 TBS margarine, or coconut oil
1/2 tsp brown mustard seeds
1 lb summer squash (this was one very large one for me, but you'd probably need 2 if you bought from the store) peeled, cut into rounds, then quartered
1/2 lb green beans (about 40 beans) ends snipped, then chopped into 2-3 pieces
1 TBS coconut butter (you can take 1/4 cup unsweetened coconut shreds and pulverize them in the blender instead, but do NOT use coconut oil instead)
1/4 cup water

Spice blend (make life easy and toss these into a small bowl before you begin cooking)
1 tsp coriander
1/2 tsp turmeric
1 tsp cumin
1/2 tsp salt
1/4 tsp cayenne pepper
1/2 tsp garlic powder

Saute the onion in the margarine until soft, then add the mustard seeds. Keep a lid nearby, these suckers fly everywhere if you're not careful. Once the seeds start popping, add in the spice blend, mix into the onions, and cook for 2 minutes.

Add the green beans and summer squash along with the coconut butter and half of the water. Cook for about 10-15 minutes, stirring frequently, but covering while not stirring. It's done when the beans are softened, but still retain some of their original crunch. If you dislike any crunch, cook for another 5 minutes, adding a little extra water to soften.

Makes 4 1/2 cup servings (I'd double it next time, personally)

Cauliflower Curry

1 head of cauliflower broken into little florets
1 large onion, diced
1 medium red skinned potato, peeled and diced finely
1 TBS olive or coconut oil

Spice Puree (make life easy and add this to a blender and blend it up before you cook)
3/4 cup canned diced fire roasted tomatoes
1.5 tsp salt
1/2 tsp garam masala
1/2 tsp cumin
1/2 tsp cayenne
1 tsp coconut butter (or 1 TBS coconut shreds minced)

In a big pan, fry up the onion, potato, and cauliflower in the olive oil.  Cook covered for about 10-15 minutes, until everything has softened. You are going to need to add some water along the way and you'll want to stir often to prevent sticking/burning. Add in the spice puree and cook for another 5-10 minutes until the flavors have unified and the vegetables are totally softened.

Makes 4 1 cup servings.

Serve atop fluffy basmati rice.


Spiced Summer Squash Nutrition (per 1/2 cup serving, makes 2 cups total)

Calories:104
Carbs: 11
Protein: 2.7 g
Fat: 6.1 g
Fiber: 4.5g
Sugars: 4.5
Vitamin A: 23%
Vitamin C: 25%
Iron: 10%

Cauliflower Curry Nutrition (per 1 cup serving, makes 4 cups total)
Calories:133
Carbs: 21
Protein: 4.6 g
Fat: 4.6 g
Fiber: 5.5g
Sugars: 6.4
Vitamin A: 6%
Vitamin C: 108%
Iron: 4%

Saturday, June 20, 2015

French Toast

I typically buy only whole wheat bread and scoff at anything without at least 3 grams of fiber per slice. Earlier in the week, I saw some locally-made (Knickerbocker out of Madison Heights, MI) French bread on sale and bought it on a whim when I noticed that it was pretty decent nutritionally for white bread. This morning, while trying to figure out brunch, French toast popped to mind. I do make it with wheat bread, and it's okay, but it is SO GOOD made with a nice, thick French bread.  Do yourself a favor and make it with French bread; you'll be happy that you did.

French toast + Amy's sausages + watermelon = brunch

Extreme bread close-up!


Ingredients:
9 thick slices of French bread
1 cup vanilla soy milk (or use plain and add a few drops of vanilla extract)
1/4 cup chickpea flour (aka besan)
2 TBS cornstarch
1/8 tsp ground mace (you can use nutmeg if you don't have mace, but mace is nicer because it's less bitter)
1/8 tsp ground cinnamon
3 TBS coconut oil
cinnamon sugar

Instructions:

In a large bowl, whisk the chickpea flour and cornstarch into the soy milk. Add the mace and cinnamon. Keep the whisk handy.

Melt 1 TBS of the coconut oil in a large pan over medium-high heat. Whisk the soy milk mix again, then dunk the bread in, coating both sides and shaking gently to remove excess. Fry in the pan for 2 minutes, flip and wait 2 minutes, and repeat until the edges are beautifully golden (about 8 minutes total worked for me). I put 3 slices at a time in my pan - do whatever fits properly in your pan. 

Once they're golden and slightly crisp, sprinkle with cinnamon sugar and serve. 

Nutrition (per 3 slices cooked in 1 TBS coconut oil, included)

Calories: 457
Carbs: 60g (29%)
Protein: 15g (36%)
Fat: 17 g (40%)
Fiber: 4 g (16%)
Sugars: 5.6 g (16%)
Vitamin A: 3%
Vitamin C: 4%
Calcium: 18%
Iron: 23%
 

Tuesday, June 16, 2015

Chopped Salad

I almost didn't post this one because it doesn't feel like a real recipe, but I loved it and thought it was delicious and satisfying and very summer heat-friendly. It's simple, especially if you like chopping. If you don't like chopping, I wouldn't recommend it. The key to the chopped salad is that every ingredient is diced. It elevates something pretty banal into something where you get a lot of different flavors and textures in every bite. It's pretty versatile, too, so if I listed something you hate, you are probably fine to swap it for something else!


Cook 2 cups of edamame and toss with a little garlic, salt, and hot mustard. Put in the fridge to cool.

Dice the following:

4 cups romaine
4 cups cabbage (I'd use purple to make it prettier)
1 red bell pepper
1 green onion
1 cup bean sprouts
1 wax pepper (or another moderately hot pepper)
1 cup pea pods
1 large cucumber
1 cup water chestnuts

Important: Make sure to get ingredients as dry as possible, or you'll wind up with a nasty salad soup.

Once your salad ingredients are nice and free of excess liquid, add to a huge bowl and toss in:

Lime zest (from one lime)
2 tsp sesame seeds (I used black sesame seeds because it looks interesting)
1/4 cup toasted almond slices or slivers
2/3 cup won ton strips
The cooled edamame from step 1

At the end, add in 1/4 cup of sesame ginger dressing and toss well. I use Newman's Own Low Fat Sesame Ginger because it's really low in calories and packs a flavorful punch. You can use something else, but you'll need to adjust the nutritional information below!

You could add in mandarins, if you want, but remember to dry them as much as possible and to add them with the dressing. I did not use them because Aaron isn't a fan.

This makes a TON of salad. You should get about 13 cups. I'm the kind of person who likes to be able to eat a great quantity of food, and this allows you a massive 4-cup serving packed with nutrients and flavor.

In a 4-cup serving:

411 calories
14.5 g fat
49.3 g carbs (16%)
28 g protein (68%)
14 g fiber (56%)
204% Vitamin A
257% Vitamin C
29% Calcium
36% Iron

Saturday, March 14, 2015

Thai Curry Soup

I made this tonight and we both thought it was a solid 5 star dish. It is SO flavorful. I'll be making it again, no doubt!


I say it's a soup, but it's not super-brothy, so you could easily serve it over rice as a saucy curry. I have a high spice tolerance and found this to be mild. I would guess that it would be just right for people who like a little kick. If you're sensitive to spicy foods, start with 1/2 tsp each of the curry paste, chili garlic sauce, and Sriracha and go from there.

Ingredients:

1 14-ounce container of extra firm tofu, pressed and diced
1 TBS toasted sesame oil
1 low-sodium vegetable bouillon cube
2 cups water
1/2 TBS Thai red curry paste
1/2 TBS chili garlic sauce
1/2 TBS Sriracha
3 frozen basil cubes (or 1 TBS basil puree or 1/4 cup fresh basil leaves, torn finely)
2 cloves garlic, minced
1 tsp grated ginger
3 carrots, peeled and cut into thin half-circles
1 cup of chopped snow peas
1.5 servings (30 grams) of dried shiitake mushroom slices, reconstituted in water
1 cup bell pepper strips (I used frozen strips, but fresh would be totally fine too)
1 cup of cut green beans (I used frozen here, too, but again fresh would work)
1 can coconut milk
juice of 1/2 lime
1/2 TBS brown sugar
1 tsp tamari or soy sauce
1 sprinkle of Thai basil, optional

Instructions

Using your soup pot, fry the tofu in the sesame oil until golden. Set aside.

Put the bouillon, water, curry paste, garlic sauce, Sriracha, basil, garlic, and ginger into the pot and bring to a boil. Add in the carrots, snow peas, mushrooms, bell peppers, and green beans and simmer for about 10 minutes, stirring often. Mix in the coconut milk and tofu and cook over low-medium heat for another 10 minutes, then add the lime juice, brown sugar, soy sauce, and Thai basil and cook, covered, until the carrots have softened.


Nutrition per serving - makes 4 servings (1.25 cups each)


Calories: 401
Fat: 26 g (a lot, yes, but that's largely in the form of healthy medium chain fatty acids from the coconut milk)
Carbohydrates: 27.6 g (9%)
Fiber: 8.3 g (33%)
Sugars: 9 g (26%)
Protein 16.8 g (40%)
Vitamin A: 184%
Vitamin C: 147%
Calcium: 14%
Iron: 42%


Monday, January 5, 2015

Anti-Deprivation Goulash

If you're like me, you started the new year with the promise that you'd ditch some unwanted weight. If you're like me, even thinking about dieting makes you hungry. One of my goals while counting calories has been to feel as satisfied as possible because otherwise I'll get cranky and/or obsess too much about food and/or eat way too much. I'm not the kind of person who can forget to eat or who can eat a cup of lettuce and a teaspoon of dressing and feel sated; I need good quantities of nutritious food. Here's a recipe that produces a hefty serving size and quells that ravenous feeling.


Ingredients:

1 TBS olive oil
2 bell peppers, diced (whatever colors you like)
1 large onion, diced
1.5 cups of Boca crumbles (or another beef substitute)
2 TBS red wine
2 14.5 ounce cans of fire roasted, diced tomatoes
4 cloves garlic
1 tsp oregano
2 tsp paprika (I used 1 tsp of sweet, 1/2 tsp of smoked, and 1/2 tsp of hot, but you can use whatever)
1 tsp caraway seeds
1 bouillon cube (I used mushroom, but you could use unbeef. Vegetable could work okay too)
1/2 cup water
4 servings of elbow pasta, cooked and set aside.

Instructions:

Heat up the olive oil in a large pot/pan and add the onion and peppers. Cook until softened and caramelized, about 8 minutes. Add in the crumbles and the red wine and cook until the crumbles are broken up and are starting to warm up, about 5 minutes. Add in the tomatoes, spices, bouillon, and water (everything except the noodles). Cook for about 15 minutes to allow the flavors to come together nicely. If you have longer, take longer! Add in the noodles and heat until warmed through and add salt and pepper to taste.

This makes 4 big servings: 2.25 cups each!

Nutrition per 1/4 of recipe (about 2.25 cups)

Calories: 367
Fat: 4.6 g (11%)
Carbs: 62 (30%)
Protein: 17.6 (42%)
Fiber 7.5 (30%)
Vitamin A: 19%
Vitamin C: 154%
Calcium: 6%
Iron: 16%